 The CD player in my Eagle Vision was slow to change tracks, didn’t seek to outer tracks, or handle my heavily scratched cd collection well… And, this finally led to some minor embarrassment – enough to drive me to fix it.
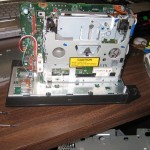
This CD player design was featured in basically all Chrysler vehicles through the 90’s (plus a earlier and later). The dash surround, at least in my Eagle, is attached with only speed clips – it pops right out when you gentley pry at the edges. Be careful detaching the wires since the harness doesn’t let you pull the deck out very far. This deck is grounded at one point only – through the strap bolted onto the back. Keep this in mind if you test with the cover off.
Now, if you’re smart, put a CD in, and seek to the last track before ejecting the CD and removing the deck – this will avoid most of the tedious manual seeking by finger tip. Remove the screws holding all the metal covers, including the heatsink side and ground bolt plate. Pull the top logic/RF board from the deck, exposing screws through the bottom board – remove these so that the bottom cover can be partially removed, giving access to the laser assembly. You will have to rotate the gear driving the slide the laser is mounted on in order to bring the laser close to the outside edge, exposing the gain potentiometer (see image below). Turn this pot clockwise to increase the laser gain – too much gain will burn out the laser, ruining your deck! You have been warned! I only had to turn the pot on mine a hair (about half a degree) to get the gain I needed – Unfortunately I couldn’t find solder points easily accessible with an ohm meter to measure the change the adjustment made.


 When I got my Yamaha CA-1010 Amplifier, it worked quite well with the exception that most of the backlight did not work. I promptly tore it down, checked the power consumption of a working bulb, and replaced the bulbs with LEDs with current limiting resistors. Also, while inside, I
 sprayed the controls with contact cleaner (isopropanol based) and followed with silicon lube to stave off oxidization.


 Main Board (Power Supply)") I was probing around a bit more and I’ve found the obvious problem, and it’s not the transistor. The power connector to tI can envision what happened now: an unregulated supply – works fine for just charging the battery, the current is low and the TPS65250 has a wide input voltage range. But, upon power up current demands go up, voltage drops, and this tiny connector melts because it can’t handle the current. It surprised me this would happen before the input fuse blew – bad design I guess, should have used a connector rated for higher current since the connector is on the supply side of the fuse. It took longer to find since I never suspected this, but, was fairly easy to fix. Next time check the simple things first.
I was probing around a bit more and I’ve found the obvious problem, and it’s not the transistor. The power connector to tI can envision what happened now: an unregulated supply – works fine for just charging the battery, the current is low and the TPS65250 has a wide input voltage range. But, upon power up current demands go up, voltage drops, and this tiny connector melts because it can’t handle the current. It surprised me this would happen before the input fuse blew – bad design I guess, should have used a connector rated for higher current since the connector is on the supply side of the fuse. It took longer to find since I never suspected this, but, was fairly easy to fix. Next time check the simple things first.
 Main Board (Power Supply)")
 Yes. I fix CD-ROM drives. Usually only specialty ones; like this XBOX one, the ones that aren’t worth it still have neat parts…